It’s not difficult to use Scikit-learn to build machine-learning models that analyze text for sentiment, identify spam e-mails, and classify textual data in other ways. But state-of-the-art text classification is most often performed with neural networks. You already know how to build neural networks that do binary classification and multiclass classification using rows of numbers as input. Let’s build on that to learn how to construct deep-learning models that classify text.
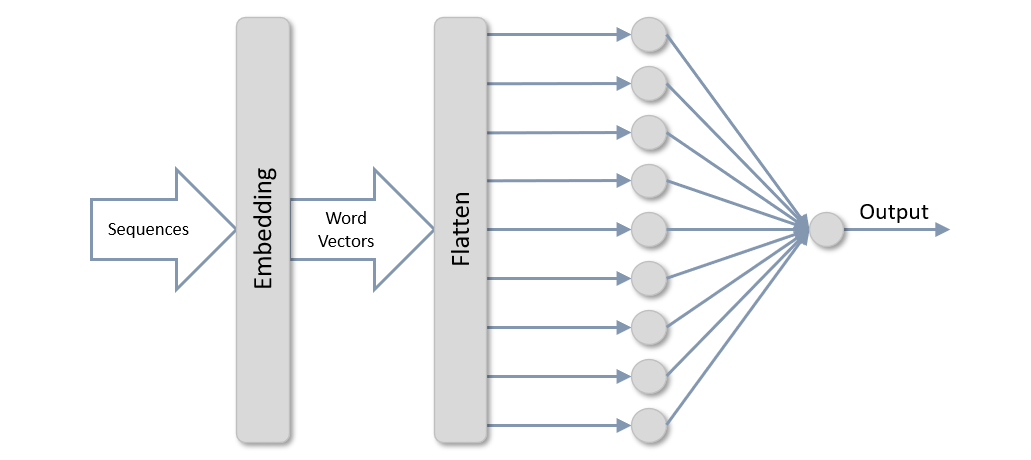
The topology of a neural network that classifies text is somewhat different than that of the networks presented thus far. It still has a dense layer (or layers), and it still has a sigmoid output layer with one neuron for binary classification or a softmax output layer with one neuron per class for multiclass classification. But preceding those layers are an embedding layer and a flatten layer. The former uses word embeddings to transform arrays, or sequences, of scalar values representing words into arrays of word vectors, which encode information about relationships between words. The latter “flattens” the 2D arrays output by the embedding layer into 1D arrays that can be input to a dense layer.
Sequences? Embedding layers? Word vectors? There’s a lot to unpack here, but once you wrap your head around a few basic concepts, neural networks that classify text are a breeze. Let’s dive in.
Preparing and Tokenizing Text
An earlier post introduced Scikit-learn’s CountVectorizer class, which converts rows of text into rows of word counts that a machine-learning model can consume. CountVectorizer also “cleans” text by converting characters to lowercase, removing numbers and punctuation symbols, and optionally removing stop words – common words such as “and” and “the” that are likely to have little relevance to the outcome.
Text must be cleaned and vectorized before it’s used to train a neural network, too, but vectorization is performed in a different way. Rather than create a table of word counts, you create a table of sequences containing tokens, which are typically indices into a dictionary, or vocabulary, created from the corpus of words in a dataset. To help, Keras provides the Tokenizer class, which you can think of as the deep-learning equivalent of CountVectorizer. Here’s an example that uses Tokenizer to create sequences from four lines of text:
from keras.preprocessing.text import Tokenizer
documents = [
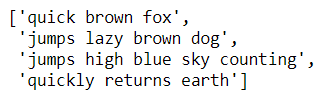
'The quick brown fox',
'Jumps over $$$ the lazy brown dog',
'Who jumps high into the blue sky after counting 123',
'And quickly returns to earth'
]
tokenizer = Tokenizer()
tokenizer.fit_on_texts(documents)
sequences = tokenizer.texts_to_sequences(documents)
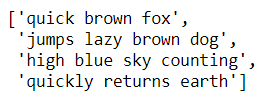
The call to fit_on_texts creates a dictionary containing all the words in the input text. The call to texts_to_sequences returns a list of sequences, which are simply arrays of indices into the dictionary:
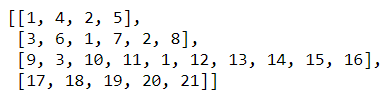
The word “brown” appears in lines 1 and 2 and is represented by the index 2. Therefore, 2 appears in both sequences. Similarly, a 3 representing the word “jumps” appears in sequences 2 and 3.
You can use Tokenizer’s sequences_to_texts method to reverse the process and convert the sequences back into text:

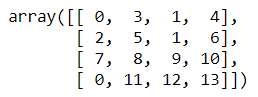
One revelation that comes from this is that Tokenizer converts text to lowercase and removes symbols, but it doesn’t remove stop words or numbers. If you want to remove stop words, you can use a separate library such as the Natural Language Toolkit (NLTK). If you’d like, you can remove words containing numbers while you’re at it:
from keras.preprocessing.text import Tokenizer
from nltk.tokenize import word_tokenize
from nltk.corpus import stopwords

documents = [
    'The quick brown fox',
    'Jumps over $$$ the lazy brown dog',
    'Who jumps high into the blue sky after counting 123',
    'And quickly returns to earth'
]

def remove_stop_words(text):
    text = word_tokenize(text.lower())
    stop_words = set(stopwords.words('english'))
    text = [word for word in text if word.isalpha() and not word in stop_words]
    return ' '.join(text)

documents = list(map(remove_stop_words, documents))

tokenizer = Tokenizer()
tokenizer.fit_on_texts(documents)
tokenizer.texts_to_sequences(documents)
The resulting sequences look like this:

Which, converted back to text, are as follows:
The sequences range from 3 to 5 values in length, but a neural network expects all sequences to be the same length. Keras’s pad_sequences function performs this final step, truncating sequences longer than the specified length and padding sequences shorter than the specified length with 0s:
from keras.preprocessing.sequence import pad_sequences

padded_sequences = pad_sequences(sequences, maxlen=4)
The resulting padded sequences look like this:
Converted back to text, they look like this:
By default, pad_sequences pads and truncates on the left, but you can include a padding=’post’ parameter if you prefer to pad and truncate on the right.
Word Embeddings
Once text is tokenized and converted into padded sequences, it is ready for training a neural network. But you probably won’t get very far training on the raw padded sequences.
The first hidden layer in a neural network that classifies text is an embedding layer whose job is to convert padded sequences of word indices into arrays of word vectors, which represent each word with an array of floating-point numbers rather than a single integer. Each word in the input text is represented by a vector in the embedding layer, and as the network is trained, vectors representing individual words are adjusted to reflect their relationship to one another. If you’re building a sentiment-analysis model and words such as “excellent” and “amazing” are generally associated with positive sentiment, then the vectors representing those words in the embedding space should be relatively close together so phrases such as “excellent service” and “amazing service” score similarly.
Implementing an embedding layer by hand is a complex undertaking (especially the training aspect), so Keras offers the Embedding class. A neural network that performs binary classification using padded sequences as input can be defined like this:
from keras.models import Sequential
from keras.layers import Dense, Flatten
from keras.layers.embeddings import Embedding

model = Sequential()
model.add(Embedding(10000, 32, input_length=100))
model.add(Flatten())
model.add(Dense(128, activation='relu'))
model.add(Dense(1, activation='sigmoid'))
model.compile(optimizer='adam', loss='binary_crossentropy', metrics=['accuracy'])
In order, the three parameters passed to the Embedding function are:
- The vocabulary size, or the number of words in the vocabulary built by Tokenizer
- The number of dimensions m in the embedding space represented by the Embedding layer
- The length n of each padded sequence
You pick the number of dimensions (the second parameter), and each word then gets encoded in the embedding space as an m-dimensional vector. For a single sequence, the output from the embedding layer is a 2D matrix of floating-point values measuring m by n. In effect, each sequence input to the embedding layer is converted into an array of word vectors. The Flatten layer following the embedding layer flattens the 2D output into a 1D array suitable for input to a Dense layer, and the dense layer classifies the values emitted from the flatten layer. You can experiment with different dimensions and input lengths in the embedding layer and different numbers of neurons in the dense layer to maximize accuracy. You can also add more dense layers if needed.
The vectors that represent individual words in an embedding layer are learned during training, just as the weights connecting neurons in adjacent dense layers are learned. If the number of training samples is sufficiently high, training the network usually creates effective vector representations of all the words. However, if you only have a few hundred training samples, the embedding layer might not have enough information to properly vectorize the corpus of text.
In that case, you can elect to use pretrained word embeddings in the embedding layer rather than rely on it to learn the word embeddings on its own. Several popular pretrained word embeddings exist in the public domain, including the GloVe word vectors developed by Stanford. Pretrained embeddings tend to model semantic relationships between words, recognizing, for example, that “king” and “queen” are related terms while “stairs” and “zebra” are not. While that can be beneficial, a network trained to classify text usually performs better when word embeddings are learned from the training data because such embeddings are task-specific. I won’t cover pretrained word embeddings here, but if you’d like to investigate further, see Using pre-trained word embeddings by Francois Chollet, the author of Keras.
Classifying Output from an Embedding Layer
One downside to using a dense layer to classify output from an embedding layer is that a dense layer considers each word independently, without regard for proximity. If the words “credit,” “card,” and “debt” appearing close together increase the chance that an e-mail is spam, a dense layer knows nothing about that because it has no “memory.”
One way to rectify that is to replace dense layers with Conv1D and MaxPooling1D layers, turning your network into a convolutional neural network, or CNN. CNNs are widely used for image classification, and my next post will introduce them in that context. But they also find application in classifying text. Here’s the same network presented in the previous example recast as a CNN:
from keras.models import Sequential
from keras.layers import Dense, Conv1D, MaxPooling1D, GlobalMaxPooling1D
from keras.layers.embeddings import Embedding

model = Sequential()
model.add(Embedding(10000, 32, input_length=100))
model.add(Conv1D(32, 7, activation='relu'))
model.add(MaxPooling1D(5))
model.add(Conv1D(32, 7, activation='relu'))
model.add(GlobalMaxPooling1D())
model.add(Dense(1, activation='sigmoid'))
model.compile(optimizer='adam', loss='binary_crossentropy', metrics=['accuracy'])
Rather than process individual words, the Conv1D layers in this example process sequences of 7 words. The MaxPooling1D layer reduces the dimensionality of the output from the first Conv1D layer in an attempt to highlight important elements. All of this will make more sense after I formally introduce CNNs in my next post. For now, just know that a simple CNN like this one can often classify text more accurately than a network that relies on traditional dense layers for classification.
Train a Neural Network to Identify Spam
One application for a neural network that classifies text is spam filtering. An earlier post demonstrated how to use Scikit to build a machine-learning model that identifies spam. Let’s build an equivalent deep-learning model with Keras and TensorFlow. We’ll use the same dataset we used before: one containing 1,000 e-mails, half of which are spam (indicated by 1s in the label column) and half of which are not (indicated by 0s in the label column). In order to run this example, you will need to install NLTK if it isn’t installed already.
Begin by downloading the dataset and copying it into the directory where your Jupyter notebooks are hosted. Then use the following code to load the dataset and display the first five rows:
import pandas as pd

df = pd.read_csv('ham-spam.csv')
df.head()
Use the following statements to remove any duplicate rows from the dataset and check for balance:
df = df.drop_duplicates()
df.groupby('IsSpam').describe()
Next, define a function named remove_stop_words that removes stop words and words that contain non-alphabetic characters from the text input to it, and use it to clean the text in the dataset’s “Text” column:
from nltk.corpus import stopwords
from nltk.tokenize import word_tokenize

def remove_stop_words(text):
    text = word_tokenize(text.lower())
    stop_words = set(stopwords.words('english'))
    text = [word for word in text if word.isalpha() and not word in stop_words]
    return ' '.join(text)

x = df.apply(lambda row: remove_stop_words(row['Text']), axis=1)
y = df['IsSpam']
Now use Keras’s Tokenizer class to tokenize the text and convert it into sequences, and pad_sequences to produce sequences that are all the same length:
from keras.preprocessing.text import Tokenizer
from keras.preprocessing.sequence import pad_sequences

max_words = 20000
max_length = 500

tokenizer = Tokenizer(num_words=max_words)
tokenizer.fit_on_texts(x)
sequences = tokenizer.texts_to_sequences(x)
x = pad_sequences(sequences, maxlen=max_length)
Define a binary-classification model that contains an Embedding layer with 32 dimensions, a Flatten layer to reshape the output from the Embedding layer, a Dense layer for classification, and an output layer with a single neuron and sigmoid activation:
from keras.models import Sequential
from keras.layers import Dense, Flatten
from keras.layers.embeddings import Embedding

model = Sequential()
model.add(Embedding(max_words, 32, input_length=max_length))
model.add(Flatten())
model.add(Dense(128, activation='relu'))
model.add(Dense(1, activation='sigmoid'))
model.compile(loss='binary_crossentropy', optimizer='adam', metrics=['accuracy'])
model.summary()
Train the network and allow Keras to use a randomly selected 20% of the training samples for validation:
hist = model.fit(x, y, validation_split=0.2, epochs=5, batch_size=20)
Use the history object returned by fit to plot the training and validation accuracy in each epoch:
import seaborn as sns
import matplotlib.pyplot as plt
%matplotlib inline
sns.set()

acc = hist.history['accuracy']
val = hist.history['val_accuracy']
epochs = range(1, len(acc) + 1)

plt.plot(epochs, acc, '-', label='Training accuracy')
plt.plot(epochs, val, ':', label='Validation accuracy')
plt.title('Training and Validation Accuracy')
plt.xlabel('Epoch')
plt.ylabel('Accuracy')
plt.legend(loc='lower right')
plt.plot()
Hopefully, the network achieved a validation accuracy in the mid 90% range. If it didn’t, train the network again.
Can a CNN detect spam with more precision than a conventional network? Let’s find out. Use the code below to create a new network that uses convolution and pooling layers to classify the output from the embedding layer:
from keras.layers import Conv1D, MaxPooling1D, GlobalMaxPooling1D

model = Sequential()
model.add(Embedding(max_words, 32, input_length=max_length))
model.add(Conv1D(32, 7, activation='relu'))
model.add(MaxPooling1D(5))
model.add(Conv1D(32, 7, activation='relu'))
model.add(GlobalMaxPooling1D())
model.add(Dense(1, activation='sigmoid'))
model.compile(loss='binary_crossentropy', optimizer='adam', metrics=['accuracy'])
model.summary()
Then call fit to train the model:
hist = model.fit(x, y, validation_split=0.2, epochs=5, batch_size=20)
Finally, plot the training and validation accuracy:
acc = hist.history['accuracy']
val = hist.history['val_accuracy']
epochs = range(1, len(acc) + 1)

plt.plot(epochs, acc, '-', label='Training accuracy')
plt.plot(epochs, val, ':', label='Validation accuracy')
plt.title('Training and Validation Accuracy')
plt.xlabel('Epoch')
plt.ylabel('Accuracy')
plt.legend(loc='lower right')
plt.plot()
You might have to train each model several times to compare the two, but in my testing, the CNN was, on average, a few percentage points better in terms of validation accuracy. Once you’re satisfied with the accuracy, use the following statements to compute the probability that an e-mail containing the text “Can you attend a code review on Tuesday? Need to make sure the logic is rock solid.” is spam:
cleaned_text = remove_stop_words('Can you attend a code review on Tuesday? Need to make sure the logic is rock solid.')
sequence = tokenizer.texts_to_sequences([cleaned_text])
padded_sequence = pad_sequences(sequence, maxlen=max_length)
model.predict(padded_sequence)[0][0]
Then do the same for another e-mail:
cleaned_text = remove_stop_words('Why pay more for expensive meds when you can order them online and save $$$?')
sequence = tokenizer.texts_to_sequences([cleaned_text])
padded_sequence = pad_sequences(sequence, maxlen=max_length)
model.predict(padded_sequence)[0][0]
What did the network predict for the first e-mail? What about the second? Do you agree with the predictions? Remember that a number close to 0.0 indicates that the e-mail is not spam, while a number close to 1.0 indicates that it is.
Automating Text Vectorization
If you’re thinking it sure would be nice not to have to clean, tokenize, and sequence text input to the model prior to training or making predictions, there is a way around it in recent versions of Keras and TensorFlow. Rather than run Tokenizer and pad_sequences manually, you can now include a TextVectorization layer in your model before the Embedding layer. Here’s an example:
from keras.models import Sequential
from keras.layers import Dense, Flatten, TextVectorization, InputLayer
from keras.layers.embeddings import Embedding
import tensorflow as tf

model = Sequential()
model.add(InputLayer(input_shape=(1,), dtype=tf.string))
model.add(TextVectorization(max_tokens=max_words, output_sequence_length=max_length))
model.add(Embedding(max_words, 32, input_length=max_length))
model.add(Flatten())
model.add(Dense(128, activation='relu'))
model.add(Dense(1, activation='sigmoid'))
model.compile(loss='binary_crossentropy', optimizer='adam', metrics=['accuracy'])
model.summary()
Note that the input layer (an instance of InputLayer) is now explicitly defined, and it’s configured to accept string input. In addition, before training the model, you need to fit the TextVectorization layer to the input data by calling the layer’s adapt method:
model.layers[0].adapt(x)
Now you no longer have to preprocess the training text, and you can pass raw text strings to predict:
model.predict(['Why pay more for expensive meds when you can order them online and save $$$?'])[0][0]
TextVectorization doesn’t remove stop words, so if you want them removed, you can do that separately or use the TextVectorization function’s standardize parameter to identify a callback function that does it for you.
Get the Code
You can download a Jupyter notebook containing the spam-detection example from the deep-learning repo that I maintain on GitHub. Feel free to check out the other notebooks in the repo while you’re at it, including one that uses deep learning to perform sentiment analysis. Also be sure to check back from time to time because I am constantly uploading new samples and updating existing ones.
