All of the machine-learning models presented so far in this series were written in Python. Models don’t have to be written in Python, but many are, thanks in part to the numerous world-class Python libraries that are available, including Pandas and Scikit-learn. ML models written in Python are easily consumed in Python apps. Calling them from other languages such as C++, Java, and C# requires a little more work. You can’t simply call a Python function from C++ as if it were a C++ function. So how do you invoke models written in Python from apps written in other languages? Put another way, how do you operationalize Python models such that they are usable in any app and any programming language?
The middle block in the diagram below shows one strategy: wrap the model in a Web service and expose its functionality through a REST API. Then any client that can generate an HTTP(S) request can invoke the model. It’s relatively easy to do with Python frameworks such as Flask. The service can be hosted locally or in the cloud, and it can even be containerized for easy deployment.
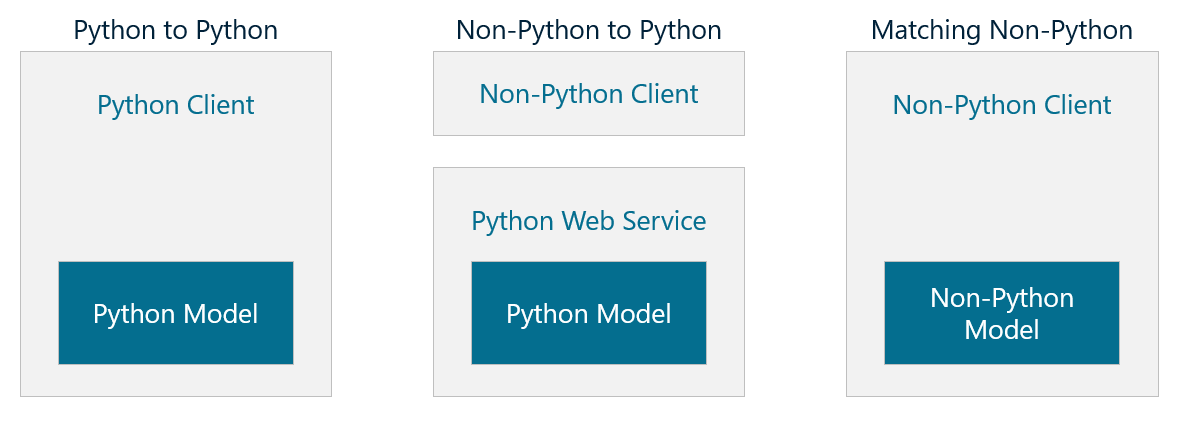
In this post, I’ll walk you through three scenarios:
- How to invoke a Python model from a Python client
- How to invoke a Python model from a non-Python client
- How to containerize Python models for easy deployment
In my next post, I’ll address the rightmost block in the diagram above by demonstrating how to build and consume machine-learning models in C#. If the client is written in C# and the model is, too, then you can invoke the model directly from the client without any middleware in between.
Consuming a Python Model from a Python Client
To first order, invoking a Python model from a Python client is simple: just call predict on the model. Of course, you don’t want to have to retrain the model every time you use it. You want to train it once, and then empower the client to recreate the model in its trained state. For that, Python programmers use the Python pickle module.
To demonstrate, the following code trains the Titanic model featured in my post on binary classification and uses it to predict the odds that a 30-year-old female passenger traveling in first class will survive the voyage:
import pandas as pd
from sklearn.linear_model import LogisticRegression
import pickle

df = pd.read_csv('Data/titanic.csv')
df = df.drop(['PassengerId', 'Name', 'Ticket', 'Cabin', 'Embarked', 'Fare', 'Parch', 'SibSp'], axis=1)
df = pd.get_dummies(df, columns=['Sex', 'Pclass'])
df.dropna(inplace=True)

x = df.drop('Survived', axis=1)
y = df['Survived']

model = LogisticRegression(random_state=0)
model.fit(x, y)

probability = model.predict_proba([[30, 1, 0, 1, 0, 0]])[0][1]
print(f'Probability of survival: {probability:.1%}')
Once the model is trained, it can be serialized into a binary file with one line of code:
pickle.dump(model, open('Data/titanic.pkl', 'wb'))
To invoke the model, a Python client can then deserialize the model, which recreates it in its trained state, and call predict_proba to get the same result:
model = pickle.load(open('Data/titanic.pkl', 'rb'))
probability = model.predict_proba([[30, 1, 0, 1, 0, 0]])[0][1]
print(f'Probability of survival: {probability:.1%}')
Now the client can quickly use the model to make a prediction, even if the model is a complex one that takes a long time to train.
My post on support-vector machines (SVMs) introduced Scikit’s make_pipeline function, which allows estimators (objects that make predictions) and transforms (objects that transform data input to the model) to be combined into a single unit, or pipeline. The pickle module can be used to serialize and deserialize pipelines, too. Here’s the model featured in my post on sentiment analysis recast to use make_pipeline to combine a CountVectorizer for transforming data with a LogisticRegression object for making predictions:
import pandas as pd
from sklearn.feature_extraction.text import CountVectorizer
from sklearn.linear_model import LogisticRegression

df = pd.read_csv('Data/reviews.csv', encoding="ISO-8859-1")
df = df.drop_duplicates()

x = df['Text']
y = df['Sentiment']

vectorizer = CountVectorizer(ngram_range=(1, 2), stop_words='english', min_df=20)
model = LogisticRegression(max_iter=1000, random_state=0)

pipe = make_pipeline(vectorizer, model)
pipe.fit(x, y)

review = 'great food and excellent service!'
pipe.predict_proba([review])[0][1]
One line of code serializes the pipeline:
pickle.dump(pipe, open('Data/sentiment.pkl', 'wb'))
A Python client can then deserialize it and call predict_proba to score a line of text for sentiment:
pipe = pickle.load(open('Data/sentiment.pkl', 'rb'))
review = 'great food and excellent service!'
pipe.predict_proba([review])[0][1]
Pickling in this manner works not just with CountVectorizer, but with other transformers such as StandardScaler, too.
One caveat to be aware of is that a model (or pipeline) should be pickled and unpickled with the same version of Scikit. Serializing the model with one version and attempting to deserialize it with another will either throw an exception or at least generate a warning message.
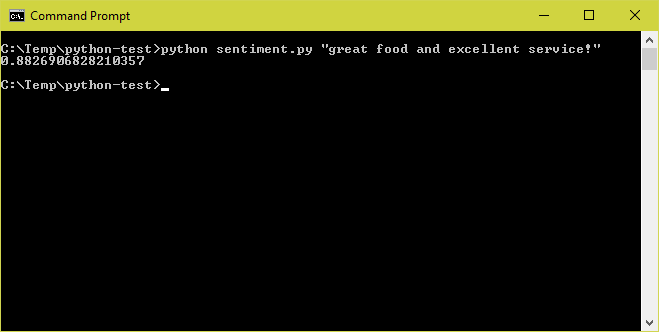
If you’d like to write a Python client that performs sentiment analysis, start by copying the code that trains a sentiment-analysis model and the line of code that serializes the pipeline into a Jupyter notebook and run it to produce sentiment.pkl. Then create a Python script named sentiment.py and paste the following statements into it:
import pickle, sys

# Get the text to analyze
if len(sys.argv) > 1:
    text = sys.argv[1]
else:
    text = input('Text to analyze: ')

# Load the pipeline containing the model and the CountVectorizer
pipe = pickle.load(open('sentiment.pkl', 'rb'))

# Pass the input text to the pipeline and print the result
score = pipe.predict_proba([[text]])[0][1]
print(score)
Copy sentiment.pkl into the same directory as sentiment.py, and then pop out to the command line and run the script:
python sentiment.py "great food and excellent service!"The output should look something like this, which is proof that you succeeded in recreating the model in its trained state and invoking it to analyze the input text for sentiment:
Consuming a Python Model from a C# Client
Suppose you wanted to invoke the sentiment-analysis model from an app written in another language – say, C#. You can’t directly call a Python function from C#, but you can wrap the Python model in a Web service and expose its predict (or predict_proba) method using a REST API. One way to code the Web service is to use Flask, a popular Web framework for Python.
To see for yourself, make sure Flask is installed on your computer. Then create a file named app.py and paste in the following code:
import pickle
from flask import Flask, request

app = Flask(__name__)
pipe = pickle.load(open('sentiment.pkl', 'rb'))

@app.route('/analyze', methods=['GET'])
def analyze():
    if 'text' in request.args:
        text = request.args.get('text')
    else:
        return 'No string to analyze'

    score = pipe.predict_proba([[text]])[0][1]
    return str(score)

if __name__ == '__main__':
    app.run(debug=True, port=5000, host='0.0.0.0')
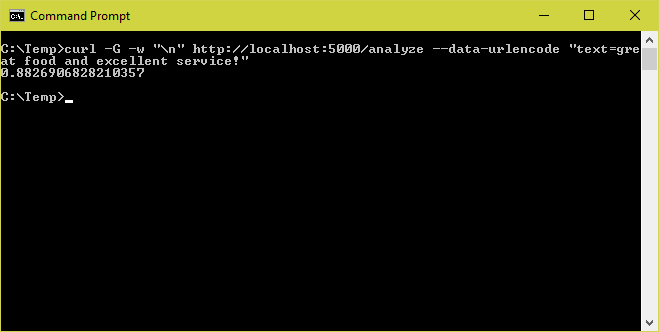
This code uses Flask to implement a Python Web service that listens on port 5000. At startup, the service deserializes the sentiment-analysis model (pipeline) saved in sentiment.pkl. The @app.route statement decorating the analyze function tells Flask to call the function when the service’s analyze method is called. If the service is hosted locally, then the following request invokes the analyze method and returns a string containing a sentiment score for the text passed in the query string:
http://localhost:5000/analyze?text=great food and excellent service!To demonstrate, go to the directory where app.py is located (make sure sentiment.pkl is there, too) and start Flask by typing:
flask runThen go to a separate command prompt and use a curl command to fire off a request to the URL:
curl -G -w "\n" http://localhost:5000/analyze --data-urlencode "text=great food and excellent service!"The output should resemble this:
If you have Visual Studio or Visual Studio Code installed on your machine and are set up to compile and run C# apps, you can use the following C# code in a command-line app to do the same thing:
using System;
using System.Net.Http;
using System.Threading.Tasks;

class Program
{
    static async Task Main(string[] args)
    {
        string text;

        // Get the text to analyze
        if (args.Length > 0)
        {
            text = args[0];
        }
        else
        {
            Console.Write("Text to analyze: ");
            text = Console.ReadLine();
        }

        // Pass the text to the Web service
        var client = new HttpClient();
        var url = $"http://localhost:5000/analyze?text={text}";
        var response = await client.GetAsync(url);
        var score = await response.Content.ReadAsStringAsync();

        // Show the sentiment score
        Console.WriteLine(score);
    }
}
Of course, you’re not limited to invoking the Web service (and by extension, the sentiment-analysis model) from C#. Any language will do, because virtually all modern programming languages provide a means for sending HTTP requests.
Incidentally, this Web service is a simple one that reads input from a query string and returns a string. For more complex input and output, you can serialize the input into JSON and transmit it in the body of an HTTP POST, and you can return a JSON payload in the response.
Containerizing a Machine-Learning Model
One downside to wrapping a machine-learning model in a Web service and running it locally is that the client computer must have Python installed, as well as all the packages that the model and Web service require. An alternative is to host the Web service in the cloud where it can be called via the Internet. It’s not hard to go out to Azure or AWS, spin up a virtual machine (VM), and install the software there. But there’s a better way. That better way is containers.
Containers have revolutionized the way software is built and deployed. A container includes an app and everything the app needs to run, including a run-time (for example, Python), the packages the app relies on, and even a virtual file system. If you’re not familiar with containers, think of them as lightweight VMs that start quickly and consume far less memory. Docker is the world’s most popular container platform, although it is rapidly being supplanted by Kubernetes.
Containers are created from container images, which are blueprints for containers in the same way that in programming, classes are blueprints for objects. The first step in creating a Docker container image that contains the machine-learning model and Web service in the previous section is creating a file named Dockerfile (no file-name extension) in the same directory as app.py and sentiment.pkl and pasting the following statements into it:
FROM python:3.6.7-stretch
RUN pip install flask numpy scipy scikit-learn==0.24.2 && \
    mkdir /app
COPY app.py /app
COPY sentiment.pkl /app
WORKDIR /app
EXPOSE 5000
ENTRYPOINT ["python"]
CMD ["app.py"]
A Dockerfile contains instructions for building a container image. This one creates a container image that includes a Python run-time, several Python packages such as Flask and Scikit-learn, and app.py and sentiment.pkl. It also instructs the Docker run-time that hosts the container to open port 5000 for HTTP requests and to execute app.py when the container starts.
I won’t go through the steps to build the container image from the Dockerfile. There are several ways to do it. For example, if Docker is installed on the local machine, you can use a docker build command like this one:
docker build -t sentiment-server .Or you can upload the Dockerfile to a cloud service such as Microsoft Azure and build it there. This prevents you from having to have Docker installed on the local machine, and it makes it easy to store the resulting container image in the cloud. (Container images are stored in container registries, and modern cloud services are capable of hosting container registries as well as containers.) If you launch a container instance in Azure, the Web service in the container can be invoked with a URL similar to this one:
http://wintellect.northcentralus.azurecontainer.io:5000/analyze?text=great food and excellent service!One of the benefits of hosting the container instance in the cloud is that it can be reached from any client app running on any machine and any operating system, and the computer that hosts the client app doesn’t have to have anything special installed. Containers can be beneficial even if you host the Web service locally rather than in the cloud. As long as you deploy a container stack such as the Docker run-time to the local machine, you don’t have to separately install Python and all the packages that the Web service requires. You just launch a container instance on the local machine and direct HTTP requests to it via localhost. This is great for testing, among other things.
Summary
Writing a Python client that invokes a Python machine-learning model requires little more than an extra line of code to deserialize the model from a .pkl file. A convenient way for a non-Python client to invoke a Python model is to wrap the model in a Python Web service and invoke the model using a REST API. That Web service can be hosted locally or in the cloud, and containerizing the Web service (and the model) simplifies deployment and makes the software more portable.
In my next post, I’ll show you one way to build machine-learning models without Python. There are many tools and libraries for building machine-learning models. The one I’ll use is Microsoft’s ML.NET, which makes building ML models with C# almost as easy as building them with Scikit – and offers a few advantages that Scikit does not.
