This post continues a series that provides a walkthrough illustrating how to work with Azure Active Directory B2C custom policies by building one from the ground up. As the series progresses, the topics will serve to show how the different parts of the AAD B2C policy syntax and the underlying framework can be brought together to realize desired functionality. At the conclusion of the series, you should be ready to both understand existing AAD B2C policies and to create new ones for yourself.
The topic areas being covered in this series are:
| Topic | Focus Area |
|---|---|
| Introduction | |
| Hello World! | Returning a simple message with a custom policy |
| Hello [Your Name Here]! | Custom policy elements and syntax, how to collect and work with user input |
| Hello! (But Only If You Have an Access Code) | How to perform input validation |
| Hello! (NOW WITH REST!) | How to make REST calls to external services for validation or information exchange |
| Hello! Let’s Add a User | How to use the backing Azure Active Directory database to store and retrieve user information |
| Hello! Please Either Sign In or Sign Up | How to either sign in an existing user or allow a new user to sign up |
| Hello! It’s Time To Clean Up a Bit <– You are here | How to use multiple files and a policy file hierarchy to manage and reuse policy content |
NOTE
This walkthrough is intended for developers who want to learn how to leverage AAD B2C Custom Policies. The content assumes you understand basic AAD B2C concepts such as how to make use of the built-in policies to implement basic user management and authentication tasks. Basic functional tutorials for AAD B2C can be found in the online documentation here.
Catching Up
In the previous posts in this series we saw how we could implement a fairly complete user journey that allowed users to sign up with a new account or sign in with an existing one. We started with a blank file and built it up, adding claims manipulation, user interface displays, data validation, HTTP calls, storage and retrieval of user information from the Azure AD user database, and authentication of users’ account credentials.
Along the way, our empty policy file has gotten quite large and a little unwieldy. Everything is stuffed into one big XML file that is now more than 850 lines long. It is perhaps the equivalent of writing an entire computer program in a single class file. It is technically functional, but can be difficult to maintain, and reusability is difficult to achieve.
In this final post in this series post we will complete the work on our “Hello World” policy. We will look at ways that we can share configuration elements across Technical Profiles that require similar configuration but provide distinct functionality. We will also see how we can break our single policy file apart into multiple policy files to allow us to reuse common elements within the policies for a given applications or across our entire enterprise. Finally, we will discuss the contents of the Azure AD B2C Custom Policy Starter Pack (Starter Pack) and how you can use it to give yourself a head start on your Azure AD B2C custom policy development.
We will continue working with the example policy that we have developed throughout the previous posts in this series. You can download a copy of that file here. Be sure to update the TenantId, PolicyId, and PublicPolicyUri attributes to the correct values from your AAD B2C tenant, update the YOUR_API_URL entries, and (if you used different names) replace your own cryptographic key names in the JWTIssuer TechnicalProfile element. Finally, you will also need to replace the OBJECT_ID and APPLICATION(CLIENT)_ID values in the Azure AD Technical Profile Metadata sections to match the corresponding values from the B2C Extensions App as was described previously in this series.
In addition to the policy file, the Visual Studio ASP.NET Core Web solution that was used to create and deploy the Web API that was introduced in an earlier previous post is also available for download. You can download a copy of that project here.
If you had any problems following along or if you ran into a problem that you could not quite solve, instructions for how to obtain completed policy files and other resources are provided in the Pre-Built Policy Files and Resources section at the end of this post.
Sharing Common Technical Profile Declarations
Our example policy includes three Technical Profiles used to Read, Write, and Update user account information that is stored in Azure AD. Although they have distinct purposes, these profiles all repeat several common element declarations, including the Protocol element, as well as the ApplicationObjectId and ClientID Metadata elements. It would be convenient and would reduce both the tedium and chance for error if these elements could be declared once and then shared across all three Technical Profiles.
Fortunately, Technical Profiles do include the ability to support that scenario trough the use of the IncludeTechnicalProfile element. With the Include Technical Profile element, one technical profile can indicate another profile to inherit from, similar to how a base class is used in object-oriented programming.
Locate the existing AADUserUpdater Technical Profile in your policy and add the following Technical Profile immediately after it, substituting the Object and Application (Client) IDs that are currently in-use in the AADUserUpdater Technical Profile:
<TechnicalProfile Id="AAD-Common">
  <DisplayName>Base Common AAD Content</DisplayName>
  <Protocol Name="Proprietary" Handler="Web.TPEngine.Providers.AzureActiveDirectoryProvider, Web.TPEngine, Version=1.0.0.0, Culture=neutral, PublicKeyToken=null"/>
  <Metadata>
    <Item Key="ApplicationObjectId">OBJECT_ID</Item>
    <Item Key="ClientId">APPLICATION(CLIENT)_ID</Item>
  </Metadata>
</TechnicalProfile>
Now add the following element immediately following the OutputClaims element declarations in the AADUserWriter, AADUserReader, and AADUserUpdater Technical Profiles.
<IncludeTechnicalProfile ReferenceId="AAD-Common"/>
Finally, go back to the AADUserWriter, AADUserReader, and AADUserUpdater Technical Profiles and remove their Protocol element declarations, as well as their ApplicationObjectId and ClientId Metadata item declarations:
<TechnicalProfile Id="AADUserWriter">
  <DisplayName>Write user information to AAD</DisplayName>
  <Metadata>
    <Item Key="Operation">Write</Item>
    <Item Key="RaiseErrorIfClaimsPrincipalAlreadyExists">true</Item>
    <Item Key="UserMessageIfClaimsPrincipalAlreadyExists">The account already exists.</Item>
  </Metadata>
  <InputClaims>
    <InputClaim ClaimTypeReferenceId="email" PartnerClaimType="signInNames.emailAddress" Required="true" />
  </InputClaims>
  <PersistedClaims>
    <PersistedClaim ClaimTypeReferenceId="email" PartnerClaimType="signInNames.emailAddress" />

    <PersistedClaim ClaimTypeReferenceId="displayName"/>
    <PersistedClaim ClaimTypeReferenceId="givenName"/>
    <PersistedClaim ClaimTypeReferenceId="surname"/>
    <PersistedClaim ClaimTypeReferenceId="passwordText" PartnerClaimType="password"/>
    <PersistedClaim ClaimTypeReferenceId="passwordPolicies" DefaultValue="DisablePasswordExpiration,DisableStrongPassword" />

    <PersistedClaim ClaimTypeReferenceId="accountType" PartnerClaimType="extension_accountType"/>
  </PersistedClaims>
  <OutputClaims>
    <OutputClaim ClaimTypeReferenceId="objectId"/>
    <OutputClaim ClaimTypeReferenceId="userPrincipalName"/>
    <OutputClaim ClaimTypeReferenceId="email" PartnerClaimType="signInNames.emailAddress"/>
  </OutputClaims>
  <IncludeTechnicalProfile ReferenceId="AAD-Common"/>
</TechnicalProfile>

<TechnicalProfile Id="AADUserReader">
  <DisplayName>Update user information to AAD</DisplayName>
  <Metadata>
    <Item Key="Operation">Read</Item>
    <Item Key="RaiseErrorIfClaimsPrincipalAlreadyExists">false</Item>
    <Item Key="RaiseErrorIfClaimsPrincipalDoesNotExist">false</Item>
  </Metadata>
  <InputClaims>
    <InputClaim ClaimTypeReferenceId="email" PartnerClaimType="signInNames.emailAddress" Required="true" />
  </InputClaims>
  <OutputClaims>
    <OutputClaim ClaimTypeReferenceId="objectId"/>
    <OutputClaim ClaimTypeReferenceId="userPrincipalName"/>
    <OutputClaim ClaimTypeReferenceId="givenName"/>
    <OutputClaim ClaimTypeReferenceId="surname"/>
    <OutputClaim ClaimTypeReferenceId="displayName"/>

    <OutputClaim ClaimTypeReferenceId="accountType" PartnerClaimType="extension_accountType"/>
  </OutputClaims>
  <IncludeTechnicalProfile ReferenceId="AAD-Common"/>
</TechnicalProfile>

<TechnicalProfile Id="AADUserUpdater">
  <DisplayName>Update user information to AAD</DisplayName>
  <Metadata>
    <Item Key="Operation">Write</Item>
    <Item Key="RaiseErrorIfClaimsPrincipalAlreadyExists">false</Item>
    <Item Key="RaiseErrorIfClaimsPrincipalDoesNotExist">true</Item>
    <Item Key="UserMessageIfClaimsPrincipalDoesNotExist">The account does not exist.</Item>
  </Metadata>
  <InputClaims>
    <InputClaim ClaimTypeReferenceId="objectId" Required="true" />
  </InputClaims>
  <PersistedClaims>
    <PersistedClaim ClaimTypeReferenceId="objectId"/>
    <PersistedClaim ClaimTypeReferenceId="displayName"/>
    <PersistedClaim ClaimTypeReferenceId="givenName"/>
    <PersistedClaim ClaimTypeReferenceId="surname"/>
    <PersistedClaim ClaimTypeReferenceId="passwordText" PartnerClaimType="password"/>
    <PersistedClaim ClaimTypeReferenceId="passwordPolicies" DefaultValue="DisablePasswordExpiration,DisableStrongPassword" />

    <PersistedClaim ClaimTypeReferenceId="accountType" PartnerClaimType="extension_accountType"/>
  </PersistedClaims>
  <OutputClaims>
    <OutputClaim ClaimTypeReferenceId="displayName"/>
  </OutputClaims>
  <IncludeTechnicalProfile ReferenceId="AAD-Common"/>
</TechnicalProfile>
Now upload the updated policy and run it, making sure it continues to behave as it did previously.
Policy File Inheritance
The Include Technical Profile element cleaned things up a little, but there is another approach that we can take. Instead of just inheriting elements of other Technical Profiles, we can actually work with inheritance across entire policy files.
Inheritance across policy files is configured by including a BasePolicy declaration. Using this element in a policy file tells the Identity Experience Framework to merge the declarations in the current policy file with the declarations in the parent file. If the parent file, in turn, happens to reference a Base Policy file, then those declarations are also merged, until the sequence runs out of Base Policy file declarations. The resulting policy that the Identity Experience Framework (IEF) uses is the composite result of the merged declarations in all of the various files.

Policy file inheritance chain
The “rules” for how elements are merged are generally:
- Start with the “root” file.
- Locate elements with the same ID in the next child file.
- Replace declarations with the same ID.
- Add additional values.
Consider the following Claim declaration in a Parent file:
<ClaimType Id="foo">
  <DisplayName>Foo Display Name</DisplayName>
  <DataType>string</DataType>
</ClaimType>
Now merge in a child file:
<ClaimType Id="foo">
  <DisplayName>Foo Display Name Override</DisplayName>
</ClaimType>

<ClaimType Id="bar">
  <DisplayName>Bar Display Name</DisplayName>
  <DataType>string</DataType>
</ClaimType>
The resulting Policy would look like the following:
<ClaimType Id="foo">
  <DisplayName>Foo Display Name Override</DisplayName>
  <DataType>string</DataType>
</ClaimType>

<ClaimType Id="bar">
  <DisplayName>Bar Display Name</DisplayName>
  <DataType>string</DataType>
</ClaimType>
NOTE:
There is a special case exception to this behavior. Within a ClaimType declaration, if you include anEnumerationRestriction declaration, you can indicate aMergeBehaviorattribute. The Merge Behavior defines how these values are merged, and you can specify Append, Prepend, and ReplaceAll. This value is specified in the child policy to describe how its values are merged with its parent.
Creating the Policy Files
For our policy, we are going to create 3 policy files – a base file, an intermediate file, and a “final” file, also known as the Relying Party file (it gets this name because it will contain the Relying Party information for our policy, making it the entry point that will be used by the IEF when applications request a specific authentication journey.) We’ll then “rearrange” the example policy file we’ve been working with and reassemble it across these three files, cleaning things up a bit.
The idea behind this arrangement is:
- The base file will be widely shared, perhaps across our entire company/enterprise. Its contents should include all of the “boilerplate” declarations that we really don’t want the policy developers to have to overly concern themselves with, as well as any elements where we want a consistent and unified definition.
- The Intermediate file will be mostly used to define elements that are common between different policies for one application or a collection of related applications (for example Sign-In/Sign-Up, Profile Editing, and Password Reset for a given application).
- The Relying Party file will contain elements that are specific to one user journey.
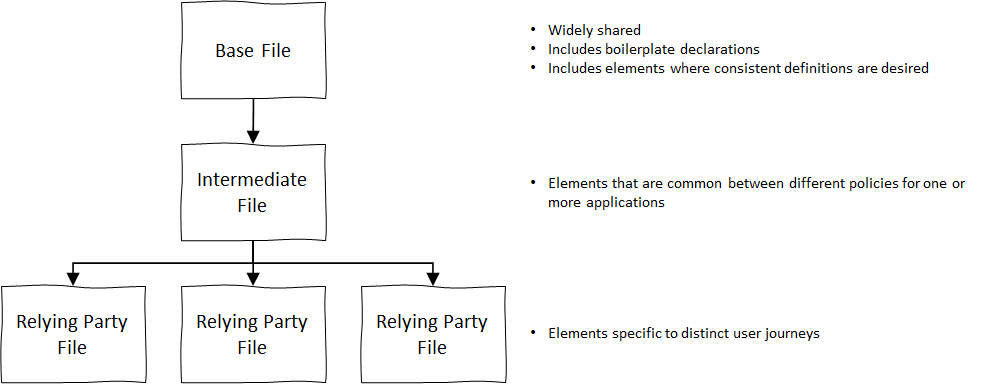
Policy file hierarchy
NOTE:
Although much of the documentation and even this blog post discuss a three-file hierarchy, there is nothing that actually requires your hierarchy to consist of exactly three files. Use a nesting strategy that is as deep or as shallow as your needs dictate, and refactor to additional (or fewer) levels to meet your own needs. For what it may be worth, using some slight-of-hand with the Azure AD B2C Portal it is possible to download and examine the policy file hierarchy for User Flows (pre-built policies). As of this writing, they currently are implemented using a 5-file-deep hierarchy.
Create a new XML file called ExampleBase.xml. Copy the following XML into the file, replacing the TENANT_ID value in the TenantId and PublicPolicyUri attributes with your Azure AD B2C instance name:
<?xml version="1.0" encoding="UTF-8" standalone="yes"?>
<TrustFrameworkPolicy
  xmlns:xsi="http://www.w3.org/2001/XMLSchema-instance"
  xmlns:xsd="http://www.w3.org/2001/XMLSchema"
  xmlns="http://schemas.microsoft.com/online/cpim/schemas/2013/06"
  PolicySchemaVersion="0.3.0.0"
  TenantId="TENANT_ID.onmicrosoft.com"
  PolicyId="B2C_1A_ExampleBase"
  PublicPolicyUri="http://TENANT_ID.onmicrosoft.com/B2C_1A_ExampleBase">

  <BuildingBlocks>
  </BuildingBlocks>

  <ClaimsProviders>
  </ClaimsProviders>

</TrustFrameworkPolicy>
Create another new XML file in the same folder as your ExampleBase.xml file, calling this one ExampleExtensions.xml. As you did previously, copy the following XML into the file, replacing the TENANT_ID value in the TenantId and PublicPolicyUri attributes with your Azure AD B2C instance name:
<?xml version="1.0" encoding="UTF-8" standalone="yes"?>
<TrustFrameworkPolicy
  xmlns:xsi="http://www.w3.org/2001/XMLSchema-instance"
  xmlns:xsd="http://www.w3.org/2001/XMLSchema"
  xmlns="http://schemas.microsoft.com/online/cpim/schemas/2013/06"
  PolicySchemaVersion="0.3.0.0"
  TenantId="TENANT_ID.onmicrosoft.com"
  PolicyId="B2C_1A_ExampleExtensions"
  PublicPolicyUri="http://TENANT_ID.onmicrosoft.com/B2C_1A_ExampleExtensions">

  <BasePolicy>
    <TenantId>TENANT_ID.onmicrosoft.com</TenantId>
    <PolicyId>B2C_1A_ExampleBase</PolicyId>
  </BasePolicy>

</TrustFrameworkPolicy>
Notice that this file includes the new XML BasePolicy element declaration. The Base Policy element tells the Identity Experience Framework (IEF) that this policy file inherits from the indicated policy file.
Now create one more XML file. This file should be named ExampleSUSI.xml (SUSI for Sign-Up, Sign-In). Place the following XML into the new file, again replacing the TENANT_ID value in the TenantId and PublicPolicyUri attributes with your Azure AD B2C instance name:
<?xml version="1.0" encoding="UTF-8" standalone="yes"?>
<TrustFrameworkPolicy
  xmlns:xsi="http://www.w3.org/2001/XMLSchema-instance"
  xmlns:xsd="http://www.w3.org/2001/XMLSchema"
  xmlns="http://schemas.microsoft.com/online/cpim/schemas/2013/06"
  PolicySchemaVersion="0.3.0.0"
  TenantId="TENANT_ID.onmicrosoft.com"
  PolicyId="B2C_1A_ExampleSUSI"
  PublicPolicyUri="http://TENANT_ID.onmicrosoft.com/B2C_1A_ExampleSUSI">

  <BasePolicy>
    <TenantId>TENANT_ID.onmicrosoft.com</TenantId>
    <PolicyId>B2C_1A_ExampleExtensions</PolicyId>
  </BasePolicy>

</TrustFrameworkPolicy>
Now it is time to start moving and rearranging content from your existing policy into these files. We’ll work down the file, section by section.
Rearranging the Building Blocks Section
Add a ClaimsSchema element in the Building Blocks section of the the ExampleBase xml file. Then copy the following claims from your existing Example policy file into the new section:
- objectId
- userPrincipalName
- passwordPolicies
- givenName
- surname
- displayName
- password
- grant_type
- scope
- nca
- client_id
- resource_id
These claims will be used by Technical Profiles, Claims Transformations, and other elements that will be common across all policies.
Also copy the Predicates and PredicateValidations sections into the Building Blocks section of the ExampleBase xml file. The Predicates are referenced by the password claim definition and are behavior that we will want for all of the policies that reference that claim.
Add a ClaimsSchema element in the Building Blocks section of the the ExampleExtensions xml file. Then copy the following claims from your existing Example policy file into the new section:
- passwordText
- message
- accountType
- domain
- domainStatus
- validDomains
- isValidDomain
- accessCode
- isValidAccessCode
These claims are specific to functionality that is likely to only be needed by some of the policies.
Copy the ClaimsTransformations and ContentDefinitions sections into the Building Blocks section of the ExampleExtensions xml file. These sections contain definitions that are likely to only be needed by some of the policies.
Rearranging the Claims Providers Section
Copy the Claims Provider that contains the TpEngine_c3bd4fe2-1775-4013-b91d-35f16d377d13 Technical Profile and the Claims Provider that contains the JwtIssuer Technical Profile into the ClaimsProviders section of the ExampleBase xml file. These two Technical Profiles are common to all policies.
Copy the Claims Provider that contains the UserInputMessageClaimGenerator and UserInputDisplayNameGenerator Technical Profiles into the ClaimsProviders section of the ExampleExtensions xml file. These Technical Profiles include functionality that is likely to only be used by some of the policies.
Copy the Claims Provider that contains the UserInformationCollector and AccessCodeInputCollector Technical Profiles into the ClaimsProviders section of the ExampleExtensions xml file. These Technical Profiles are used to gather user input, and therefore include functionality that is likely to only be used by some of the policies.
Working with the next two Claims Providers will be a little more nuanced. We have already seen the Azure Active Directory Technical Profiles referencing and sharing common elements with the IncludeTechnicalProfile element. Nonetheless, the basic operations of Reading, Writing, and Updating information in Azure Active Directory are core functionality that most policies will require. However, there are some non-core claims and behaviors, as well as some specific values that will require some additional work, which we will soon examine more closely.
For now, copy the Claims Provider that contains the PasswordCopier, AADUserWriter, AADUserReader, and AADUserUpdater Technical Profiles into the ClaimsProviders section of the ExampleBase xml file.
Select the PasswordCopier Technical Profile from the Claims Provider that you just moved and copy it into the Claim Generator Technical Profiles Claims Provider section in the ExampleExtensions file (along with the rest of the Claims Transformation Technical Profiles.) Remove the copy from the ExampleBase xml file.
Copy the the Claims Provider that contains the LoginUser Technical Profile into the ClaimsProviders section of the ExampleBase xml file. Move the UserSignInCollector Technical Profile into the Claims Provider in the ExampleExtensions xml file that contains the UserInputMessageClaimGenerator and UserInputDisplayNameGenerator Technical Profiles, grouping the Self Asserted Technical Profiles together.
Splitting Item Definitions Across Files
Try to upload the ExampleBase.xml policy file to your Azure AD B2C tenant. You should receive an error.
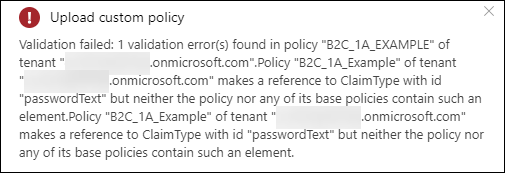
Error when uploading the ExampleBase.xml file
Whenever you upload a policy file (or policy file portion) to Azure AD B2C, the IEF XML parser evaluates its content based on the elements defined in the policy file or the policy files that it inherits from. The gist of this error is that the passwordText claim is referenced by the AADUserWriter and AADUserUpdater Technical Profiles, but the claim is defined in a child policy that has not yet been uploaded. The same problem exists for the accountType claim, which is also included in the AADUserReader Technical Profile.
The solution to this problem is to move the portions of the Technical Profiles into a policy file where the elements they reference have in fact been defined. Add the following Claims Provider to the ExampleExtensions file:
<ClaimsProvider>
  <DisplayName>Azure Active Directory Technical Profiles</DisplayName>
  <TechnicalProfiles>
    <TechnicalProfile Id="AADUserWriter">
      <PersistedClaims>
        <PersistedClaim ClaimTypeReferenceId="passwordText" PartnerClaimType="password"/>
        <PersistedClaim ClaimTypeReferenceId="accountType" PartnerClaimType="extension_accountType"/>
      </PersistedClaims>
    </TechnicalProfile>

    <TechnicalProfile Id="AADUserReader">
      <OutputClaims>
        <OutputClaim ClaimTypeReferenceId="accountType" PartnerClaimType="extension_accountType"/>
      </OutputClaims>
    </TechnicalProfile>

    <TechnicalProfile Id="AADUserUpdater">
      <PersistedClaims>
        <PersistedClaim ClaimTypeReferenceId="passwordText" PartnerClaimType="password"/>
        <PersistedClaim ClaimTypeReferenceId="accountType" PartnerClaimType="extension_accountType"/>
      </PersistedClaims>
    </TechnicalProfile>
  </TechnicalProfiles>
</ClaimsProvider>
Now remove the PersistedClaim declarations for passwordText and accountType from the AADUserWriter and AADUserUpdater Technical Profiles and the OutputClaim declaration for accountType from the AADUserReader Technical Profile in the ExampleBase file.
NOTE:
Remember – when a request is made to use the ExampleExtension policy or a policy that uses ExampleExtension as its base, the IEF will consolidate the policy files, merging and replacing elements with matching ID’s. Unfortunately, right now there is no way to see this consolidated version of a policy file.
While we are here we should move some other items to the Extensions File. Let’s split the AAD-Common Metadata Key items and the IDs defined in the LoginUser policy to our Extensions file.
Insert the following Technical Profile into the Claims Provider that you just added to the ExampleExtensions file:
<TechnicalProfile Id="AAD-Common">
  <Metadata>
    <Item Key="ApplicationObjectId">OBJECT_ID</Item>
    <Item Key="ClientId">APPLICATION(CLIENT)_ID</Item>
  </Metadata>
</TechnicalProfile>
Locate the corresponding ApplicationObjectId and ClientId values from the original file and substitute those in for OBJECT_ID and APPLICAITON(CLIENT)_ID, respectively.
Now remove the Metadata block from the AAD-Common Technical Profile defined in the ExampleBase policy file.
Finally, add the following Claims provider to the ExampleExtensions file:
<ClaimsProvider>
  <DisplayName>OpenID Connect Technical Profiles</DisplayName>
  <TechnicalProfiles>
    <TechnicalProfile Id="LoginUser">
      <Metadata>
        <Item Key="client_id">PROXY_ID_APPID</Item>
        <Item Key="IdTokenAudience">ID_APPID</Item>
      </Metadata>
      <InputClaims>
        <InputClaim ClaimTypeReferenceId="client_id" DefaultValue="PROXY_ID_APPID" />
        <InputClaim ClaimTypeReferenceId="resource_id" PartnerClaimType="resource" DefaultValue="ID_APPID" />
      </InputClaims>
    </TechnicalProfile>
  </TechnicalProfiles>
</ClaimsProvider>
Locate the client_id and IdTokenAudience items from the Metadata section inside the LoginUser Technical Profile in the ExampleBase file and substitute them for the PROXY_ID_APPID and AD_APPID values, respectively. Do the same for the client_id and resource_id InputClaim declarations.
Now remove the client_id and IdTokenAudience items from the Metadata section inside the LoginUser Technical Profile in the ExampleBase file. Do the same for the client_id and resource_id InputClaim declarations in the same Technical Profile.
Special Consideration for Self-Asserted Technical Profiles
There is an important “gotcha” you need to be aware of when you are splitting Self-Asserted Technical Profiles across multiple files.
Recall form earlier in this series that using DisplayClaims elements in a Self-Asserted Technical Profile is a relatively new addition. Up until their introduction, OutputClaims were used to perform double-duty. They determined the fields that would be presented to users for data entry, as well as what claims would be returned to the Claims Bag when the Self Asserted Technical Profile completed.
A problem occurs if you define a Self-Asserted Technical Profile that uses Output Claims to collect data in a parent file, and then override that in a child file with an implementation that uses Display Claims.
What will happen is that since the merged Technical Profile declaration includes a DisplayClaims element, the IEF will then only use the Display Claims to render user interface elements. Any Output Claims that had previously been shown as user interface elements will be skipped.
Additional information about this issue is captured in the Display Claims documentation.
Rearranging the User Journeys and RelyingParty Sections
Copy the UserJourneys and RelyingParty sections from your Example policy file into the ExampleSUSI xml file. The Relying Party section defines the behavior of a specific policy, so it makes sense for it to be included in a file specific to that policy.
The Relying Party specifies the User Journey steps, and those are usually specific to a distinct policy and not shared, so it also follows to include them in the relying party file.
NOTE:
It is actually common for the file that includes the Relying Party to only include that section, and for the User Journey steps to be placed into an intermediate file like an Extensions file. I currently prefer to group my User Journey steps with the Relying Party declaration. I find it makes things a bit more readable for me, but feel free to include them in an intermediate file if you are so inclined.
Uploading and Running the Policy Files
Let’s confirm the contents of each of your policy files. Basically, they should contain the following:
- ExampleBase
- Building Blocks
- Claims Schema
- objectId
- userPrincipalName
- passwordPolicies
- givenName
- surname
- displayName
- password
- grant_type
- scope
- nca
- client_id
- resource_id
- Predicates (details omitted for brevity)
- PredicateValidations (details omitted for brevity)
- Claims Schema
- Claims Providers (Technical Profiles)
- TpEngine_c3bd4fe2-1775-4013-b91d-35f16d377d13
- JwtIssuer
- AADUserWriter
- AADUserReader
- AADUserUpdater
- AAD-Common (but has no content)
- LoginUser
- Building Blocks
- ExampleExtensions
- Building Blocks
- Claims Schema
- passwordText
- message
- accountType
- domain
- domainStatus
- validDomains
- isValidDomain
- accessCode
- isValidAccessCode
- Claims Transformations
- CreateDisplayNameTransformation
- CreateMessageTransformation
- GetDomainFromEmail
- AssertIsValidDomainIsTrue
- CopyPassword
- Content Definitions
- SelfAssertedContentDefinition
- SignupOrSigninContentDefinition
- Claims Schema
- Claims Providers (Technical Profiles)
- UserInputMessageClaimGenerator
- UserInputDisplayNameGenerator
- PasswordCopier
- UserInformationCollector
- AccessCodeInputCollector
- UserSignInCollector
- HttpCompanyDomainsCollector
- HttpStringCollectionContainsClaim
- CheckAccessCodeViaHttp
- AADUserWriter (passwordText and accountType claims)
- AADUserReader (accountType claim)
- AADUserUpdater (passwordText and accountType claims)
- AAD-Common (ApplicationObjectId and ClientId declarations)
- LoginUser (client_id and IdTokenAudience Metadata, client_id and resource_id Input Claims)
- Building Blocks
- ExampleSUSI
- User Journeys
- HelloWorldUserJourney
- RelyingParty
- HelloWorldPolicyProfile
- User Journeys
Now let’s upload the policy files. First upload ExampleBase, then ExampleExtensions, and finally ExampleSUSI. Once the three policy file have been uploaded, go ahead and run the ExampleSUSI policy. It should be have the same as your policy previously did.
Instead of one big huge 800+ line file, the contents are now split into a 300+ line Base file that can be shared across all of your policies, a 400+ line Extensions file that can be reused through a subset of your policies, and a 100+ line SUSI file that is specific to your Sign-up/Sign-in workflow.
You may notice that the contents of the Base file are pretty generic. Furthermore, the approach to the AAD-Common and LoginUser elements in the Extensions file is perhaps something that will be repeated. With this in mind, let’s revisit the Policy Starter Pack.
Working with the Custom Policy Starter Pack
It turns out that Azure AD B2C provides a set of pre-built set of policy files called the Azure AD B2C Custom Policy Starter Pack (Starter Pack). When we first started this series, we opted to start with a blank XML file instead of these Starter Pack policies. Why? The idea behind this series has been to demystify working with custom policies, explaining the components and how they can be assembled to realize your objectives. And while the Starter Pack files are incredibly valuable, I have found that learning policies by trying to understand everything that is in there can be quite overwhelming.
If you have been following this series up until now, hopefully you understand the various components and how they relate to each other. We have seen Claims (variables), Claims Transformations (operations), Claims Providers/Technical Profiles (functions), User Journeys/Orchestration Steps, and Relying Party declarations. We’ve seen how to exchange information via a User Interface, with HTTP endpoints, and with Azure Active Directory (both AAD storage and AAD identity endpoints.) The goals behind how these have been presented have been:
- when you now see these items in action within an Azure AD B2C policy, you will understand what they do;
- when you need to build functionality into a policy, you will have an idea as to where to start.
Declarations for many of the elements that we have seen and used so far are included in the Starter Pack. In many cases, you can simply either override or augment parts of the existing declarations.
The Starter Pack content is available in its own GitHub repository. You can either download a ZIP file with the archive’s contents or clone the repository (I generally prefer the clone approach myself.)
The Starter Pack files are broken into five sections, including:
| Folder | Content |
|---|---|
| LocalAccounts | Base and Extensions files for working with Local Accounts (accounts where the username and password are maintained in the Azure AD B2C tenant.)
Also includes RP files for SignUp/SignIn, Profile Edit, and Password Reset flows. |
| SocialAccounts | Base and Extensions files for working with a Social Identity Provider (Facebook.)
Also includes RP files for SignUp/SignIn and Profile Edit flows. |
| SocialAndLocalAccounts | Base and Extensions files for working with both Local Accounts and a Social Identity Provider (Facebook.)
Also includes RP files for SignUp/SignIn, Profile Edit, and Password Reset flows. |
| SocialAndLocalAccountsWithMfa | Similar to the SocialAndLocalAccounts policies, except the User Journeys include using phone-based MFA (via the PhoneFactor Protocol Technical Provider) to validate the user account. |
| Scenarios | A collection of policies used to address some common implementation scenarios. |
The majority of the functional elements in the Starter Pack policy files are in the TrustFrameworkBase.xml file contained in each folder. The TrustFrameworkExtensions.xml references the TrustFrameworkBase.xml file. The Extensions files in the sections that involve Local identity providers contain an extension of the login-NonInteractive Technical Profile, which is the technical profile used for Azure AD sign-in and requires you to set the client_id and IdTokenInteractive Metadata element values, as well as the client_id and resource_id InputClaim element values.
The Extension files in the sections that involve Social identity providers contain an extension of the Facebook-OAUTH Technical Profile, which is used to authenticate with the Facebook identity provider similar to what the login-NonInteractive Technical Profile provides for Azure AD. In this case, you need to provide a value for the client_id Metadata element.
The Relying Party files (SignUpOrSignIn.xml, ProfileEdit.xml, PasswordReset.xml) reference the TrustFrameworkExtensions.xml file and contain the RelyingParty element definition for the profile.
TrustFrameworkBase.xml
Since it contains the bulk of the functionality offered by the Starter Pack, let’s examine the contents of the TrustFrameworkBase.xml file.
Building Blocks – Claims Definitions
The TrustFrameworkBase file provides prebuilt definitions for quite a few claims:
| Claim | Purpose |
|---|---|
| objectId | Used throughout policy to track the ID assigned to the user account in Azure AD |
| signInName | Username that is collected when a user signs in and sent to Azure AD login |
| signInNames.emailAddress | Value returned when user account is read from Azure AD |
| password | Password that is collected and sent to Azure AD login |
| newPassword | Password value collected for new user accounts or password changes and then saved to the user account in Azure AD |
| reenterPassword | Used to collect a password confirmation for new user accounts or password changes |
| newUser | Semi-static value that is returned as “true” when writing a new user account to Azure AD. False otherwise. |
| accountEnabled | Returned when reading user account by email address from Azure AD. Will throw if reading a user where this is set. |
| userPrincipalName | Internet-style login name for a user account, taking format @.onmicrosoft.com. Returned from login with Azure AD and Azure AD reads and writes |
| otherMails | Used to return multiple email address that may be recorded for a single user account when reading the account from Azure AD. |
| Username that is captured as email address when user signs up or changes passwords, and is used when user account is first written to Azure AD or read from Azure AD by email address. | |
| displayName | Required when saving a user account. Returned from login requests or when reading the user account. |
| client_id | Parameter used for Azure AD login |
| resource_id | Parameter used for Azure AD login |
| nca | Parameter used for Azure AD login |
| grant_type | Parameter used for Azure AD login |
| scope | Parameter used for Azure AD login |
| objectIdFromSession | |
| givenName | Optional user attribute collected during Azure AD login and reading/writing user account from/to Azure AD. |
| surname | Optional user attribute collected during Azure AD login and reading/writing user account from/to Azure AD. |
| tenantId | Id of the Azure AD tenant, retrieved either during login or from the current context via a Claims Resolver. |
| passwordPolicies | Static value used when saving user account to Azure AD |
| authenticationSource | Static value set to “localAccountAuthentication” as a result of login with Azure AD |
| executed-SelfAsserted-Input | Static value that is set to “true” if user account properties are updated via sign-up or profile-edit. |
| sub | Not used in Local Account Starter Pack policies |
| socialIdpUserId(*) | Not used in Local Account Starter Pack policies |
| upnUserName | Not used in Local Account Starter Pack policies |
| identityProvider | Not used in Local Account Starter Pack policies |
Building Blocks – Claims Transformations
The TrustFrameworkBase file provides two pre-built claims transformations:
| Transformation | Purpose |
|---|---|
| CreateOtherMailsFromEmail | Used to take the “OtherMails” claims that is returned when reading a user account from Azure AD and adds the primary email address to that collection (which is normally omitted from that list.) |
| AssertAccountEnabledIsTrue | Used to assert when a user account that has been disabled is read by email address from Azure AD. |
Building Blocks – Content Definitions
The TrustFrameworkBase file provides several pre-built content definition declarations:
| Content Definition | Purpose |
|---|---|
| api.signuporsignin | Serves as the entry-point to allow a user to either sign-in or sign-up. |
| api.idpselections | Lists identity providers that users can choose from during sign-in. Used as the entry point to User Profile Edit in the Local Accounts policies. |
| api.localaccountsignup | Used to allow a user to sign up with a local account. |
| api.selfasserted | General-purpose page for collecting user input. |
| api.selfasserted.profileupdate | Used to collect information for updating a user profile. |
| api.localaccountpasswordreset | Used to collect password-reset information. |
| api.idpselections.signup | Lists identity providers that users can choose from during sign-up. Not used in the Local Accounts policies. |
| api.error | Used to display an error page. |
Claims Providers (Technical Profiles)
The TrustFrameworkBase file provides several pre-built Technical Profiles:
| Technical Profile | Purpose |
|---|---|
| login-NonInteractive | Performs user sign-in with Azure AD. Extended in the Extensions file so you can provide your tenant’s application IDs. |
| AAD-Common | Shared common/base policy used for reading and writing user accounts from/to Azure AD. |
| AAD-UserReadUsingEmailAddress | Read a user account from Azure AD using the email address as the key. |
| AAD-UserReadUsingObjectId | Read a user account from Azure AD using the account’s internal Object ID as the key. |
| AAD-UserWriteUsingLogonEmail | Writes a new user account to Azure AD. Throws if a user with the given email already exists. |
| AAD-UserWritePasswordUsingObjectId | Updates a user account password in Azure AD. |
| AAD-UserWriteProfileUsingObjectId | Updates a user account profile in Azure AD. |
| SelfAsserted-LocalAccountSignin-Email | Collects user account sign-in during Sign-In/Sign-Up or Profile Update. |
| LocalAccountSignUpWithLogonEmail | Collects user account information during Sign-Up. |
| SelfAsserted-ProfileUpdate | Collects user account information for a Profile Update. |
| LocalAccountDiscoveryUsingEmailAddress | Performs email validation/confirmation prior to a Password Reset |
| LocalAccountWritePasswordUsingObjectId | Collects (and confirms) new user password during a Password Reset. |
| JwtIssuer | Returns a JWT Token from the various user journeys. |
| TpEngine_c3bd4fe2-1775-4013-b91d-35f16d377d13 | Required Technical Profile. |
NOTE:
Be sure to recall the earlier discussion about Special Considerations for Self-Asserted Technical Profiles when merging multiple policy files. If a child file includes DisplayClaims elements, this overrides the display of any controls from the parent’s OutputClaims elements. As of this writing, all of the Self-Asserted Technical Profiles included in the Trust Framework Base file rely on OutputClaims for user interface inclusion. If you want to add additional user interface elements in an Extension file, you must either use OutputClaims yourself or explicitly include the elements from the Base file as DisplayClaims in your extension.
User Journeys
The TrustFrameworkBase file provides several pre-built User Journeys:
| User Journey | Description |
|---|---|
| SignUpOrSignIn | 1) Present a user interface to collect user sign-in or choose to sign up 2) If no Object ID is set, present a user interface to sign up 3) Read the user from Azure AD by Object ID 4) Return the JWT token |
| ProfileEdit | 1) Present a user interface to select the Identity Provider (local only) 2) Therefore, sign in the user 3) Read the user from Azure AD by Object ID 4) Present a user interface to collect profile update information (writes to Azure AD via the Validation Technical Profile) 5) Return the JWT token |
| PasswordReset | 1) Collect and verify the user’s email address 2) Present a user interface to collect an updated password (writes to Azure AD via the Validation Technical Profile) 3) Return the JWT token |
Prebuilt Policy Files and Resources
If you had any problems following along or if you ran into a problem that you could not quite solve, a completed version of the policy files that were developed in this post is available for download. You can download a copy of those files here. Be sure to update the TenantId, PolicyId, and PublicPolicyUri attributes to the correct values from your AAD B2C tenant, update the YOUR_API_URL entries, and (if you used different names) replace your own cryptographic key names in the JWTIssuer TechnicalProfile element. Finally, you will also need to replace the OBJECT_ID and APPLICATION(CLIENT)_ID values in the Azure AD Technical Profile Metadata sections to match the corresponding values from the B2C Extensions App as is described above.
In addition to the policy files, the Visual Studio ASP.NET Core Web solution that was used to create and deploy the Web API that was introduced in the previous post is also available for download. You can download a copy of that project here.
Recap
It’s been quite the ride to get from a blank file to this point. Hopefully you have had an opportunity to learn a little bit about how to assemble an Azure AD B2C custom policy and/or how to interpret one that is already assembled. (Oh, and somewhere in the middle of all of it, everything got turned upside-down by a Global Pandemic.)
This is the end of the road for this particular series. However, it is not the end for posts about Azure AD B2C and Azure AD B2C Custom Policies. Now that the fundamentals are out of the way, there are many, many more topics to be addressed. And the Azure AD B2C team is not staying still either – they have a lot of cool things coming out. Stay tuned for more!
